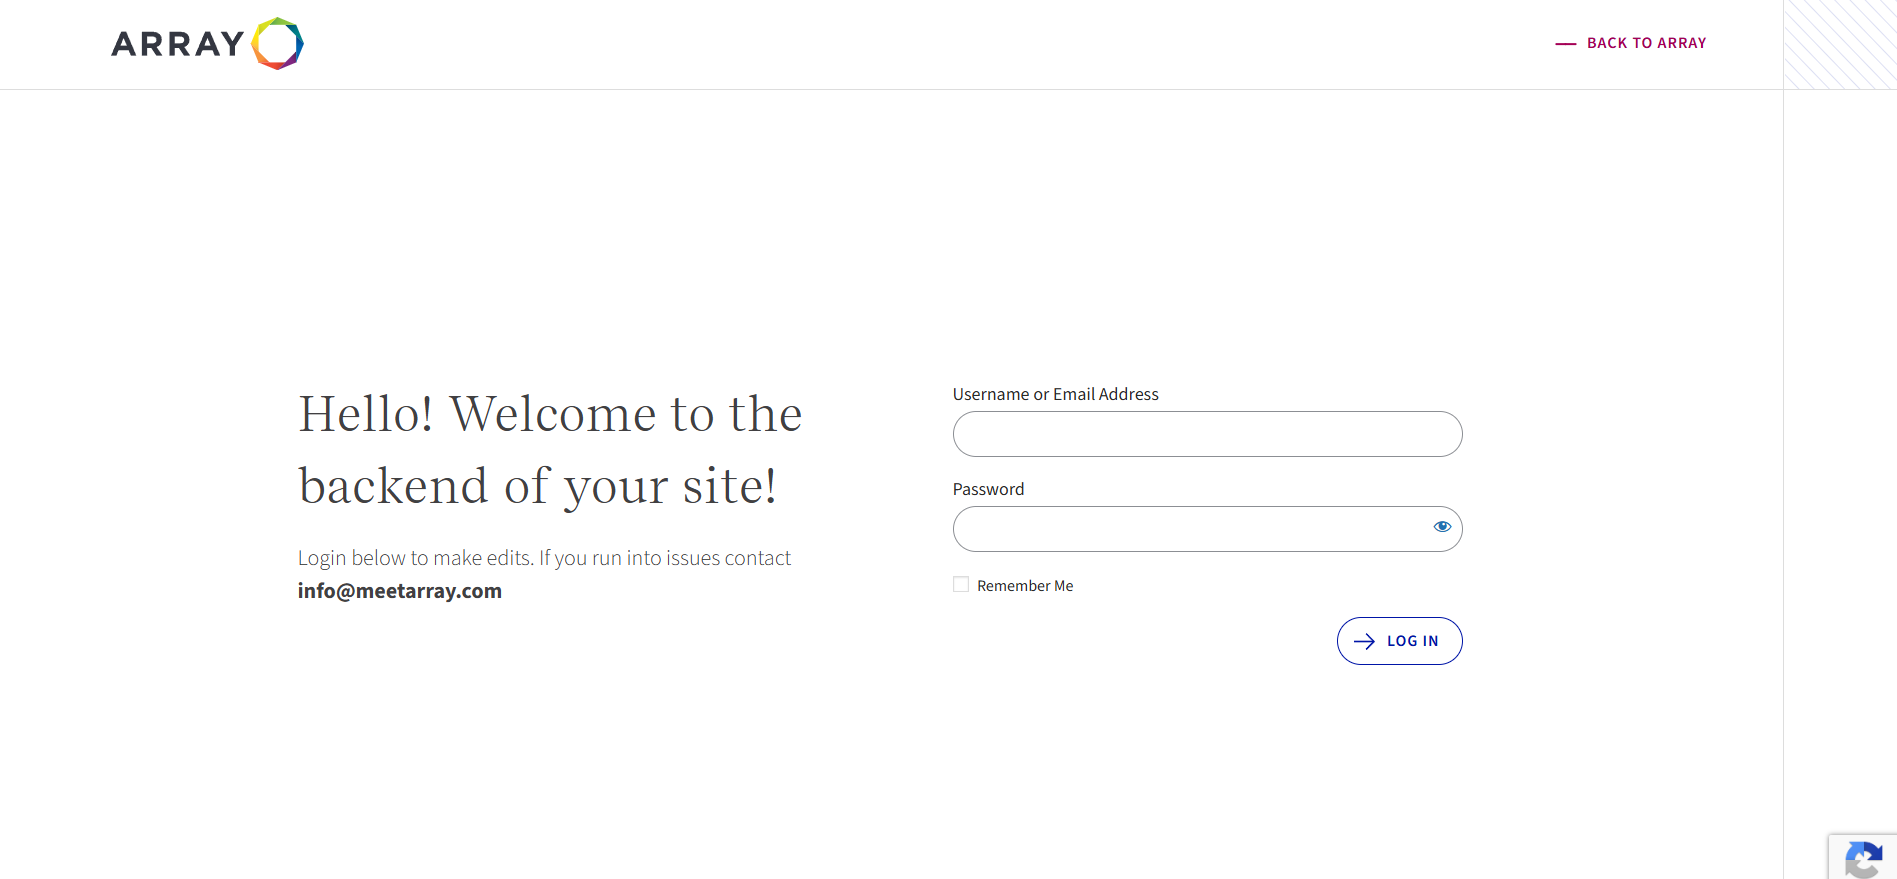
To edit your site you will need to first login to WordPress. This can be done at your website’s URL with /login appended to it (eg. www.website.com/login, arraystudios.com/login).
Going to www.yourURL.com/login will greet you with the following page. Here you can enter your username/email and password to login to your accounts.
Use the Remember me checkbox to save your username/email for future visits. You can also click the lost your password? link to initiate a password reset in the event that a password is lost or needs to be changed.
Default login screen for wordpress located at /login. Enter username and password to login.Once you have logged in you will be greeted with the wordpress dashboard.Once logged in your site will now display with a black admin bar across the top which you can use to edit or log out.
Now that you have successfully logged in you are ready to edit!
01
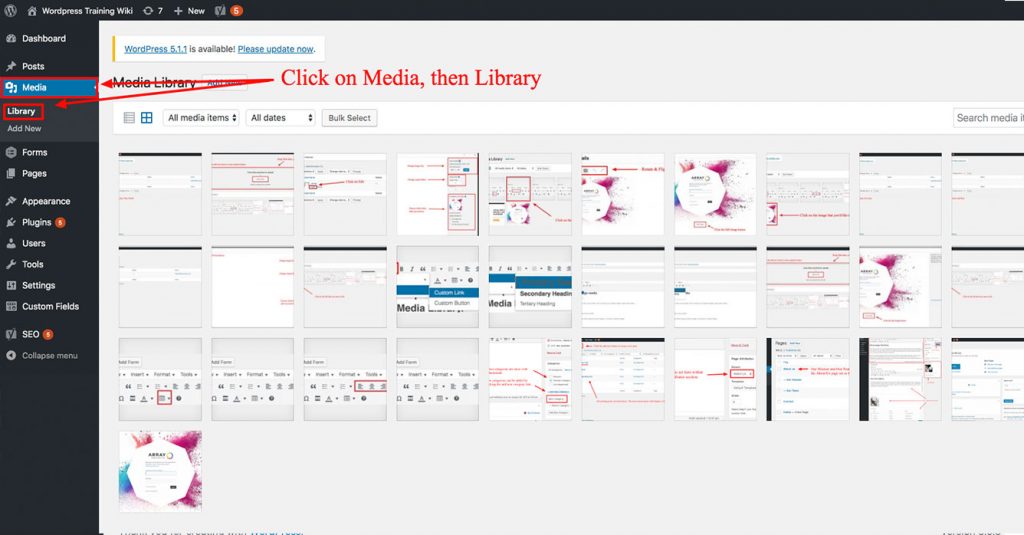
How to Login to WordPress
+
To edit your site you will need to first login to WordPress. This can be done at your website’s URL with /login appended to it (eg. www.website.com/login, arraystudios.com/login).
Going to www.yourURL.com/login will greet you with the following page. Here you can enter your username/email and password to login to your accounts.
Use the Remember me checkbox to save your username/email for future visits. You can also click the lost your password? link to initiate a password reset in the event that a password is lost or needs to be changed.
Default login screen for wordpress located at /login. Enter username and password to login.Once you have logged in you will be greeted with the wordpress dashboard.Once logged in your site will now display with a black admin bar across the top which you can use to edit or log out.
Now that you have successfully logged in you are ready to edit!
02
Editing Pages & Posts
+
WordPress content is split into either pages or posts.
Both pages and posts contain a text editor, a featured image, and a title. They look similar in the backend of the site but are used for different purposes.
Pages
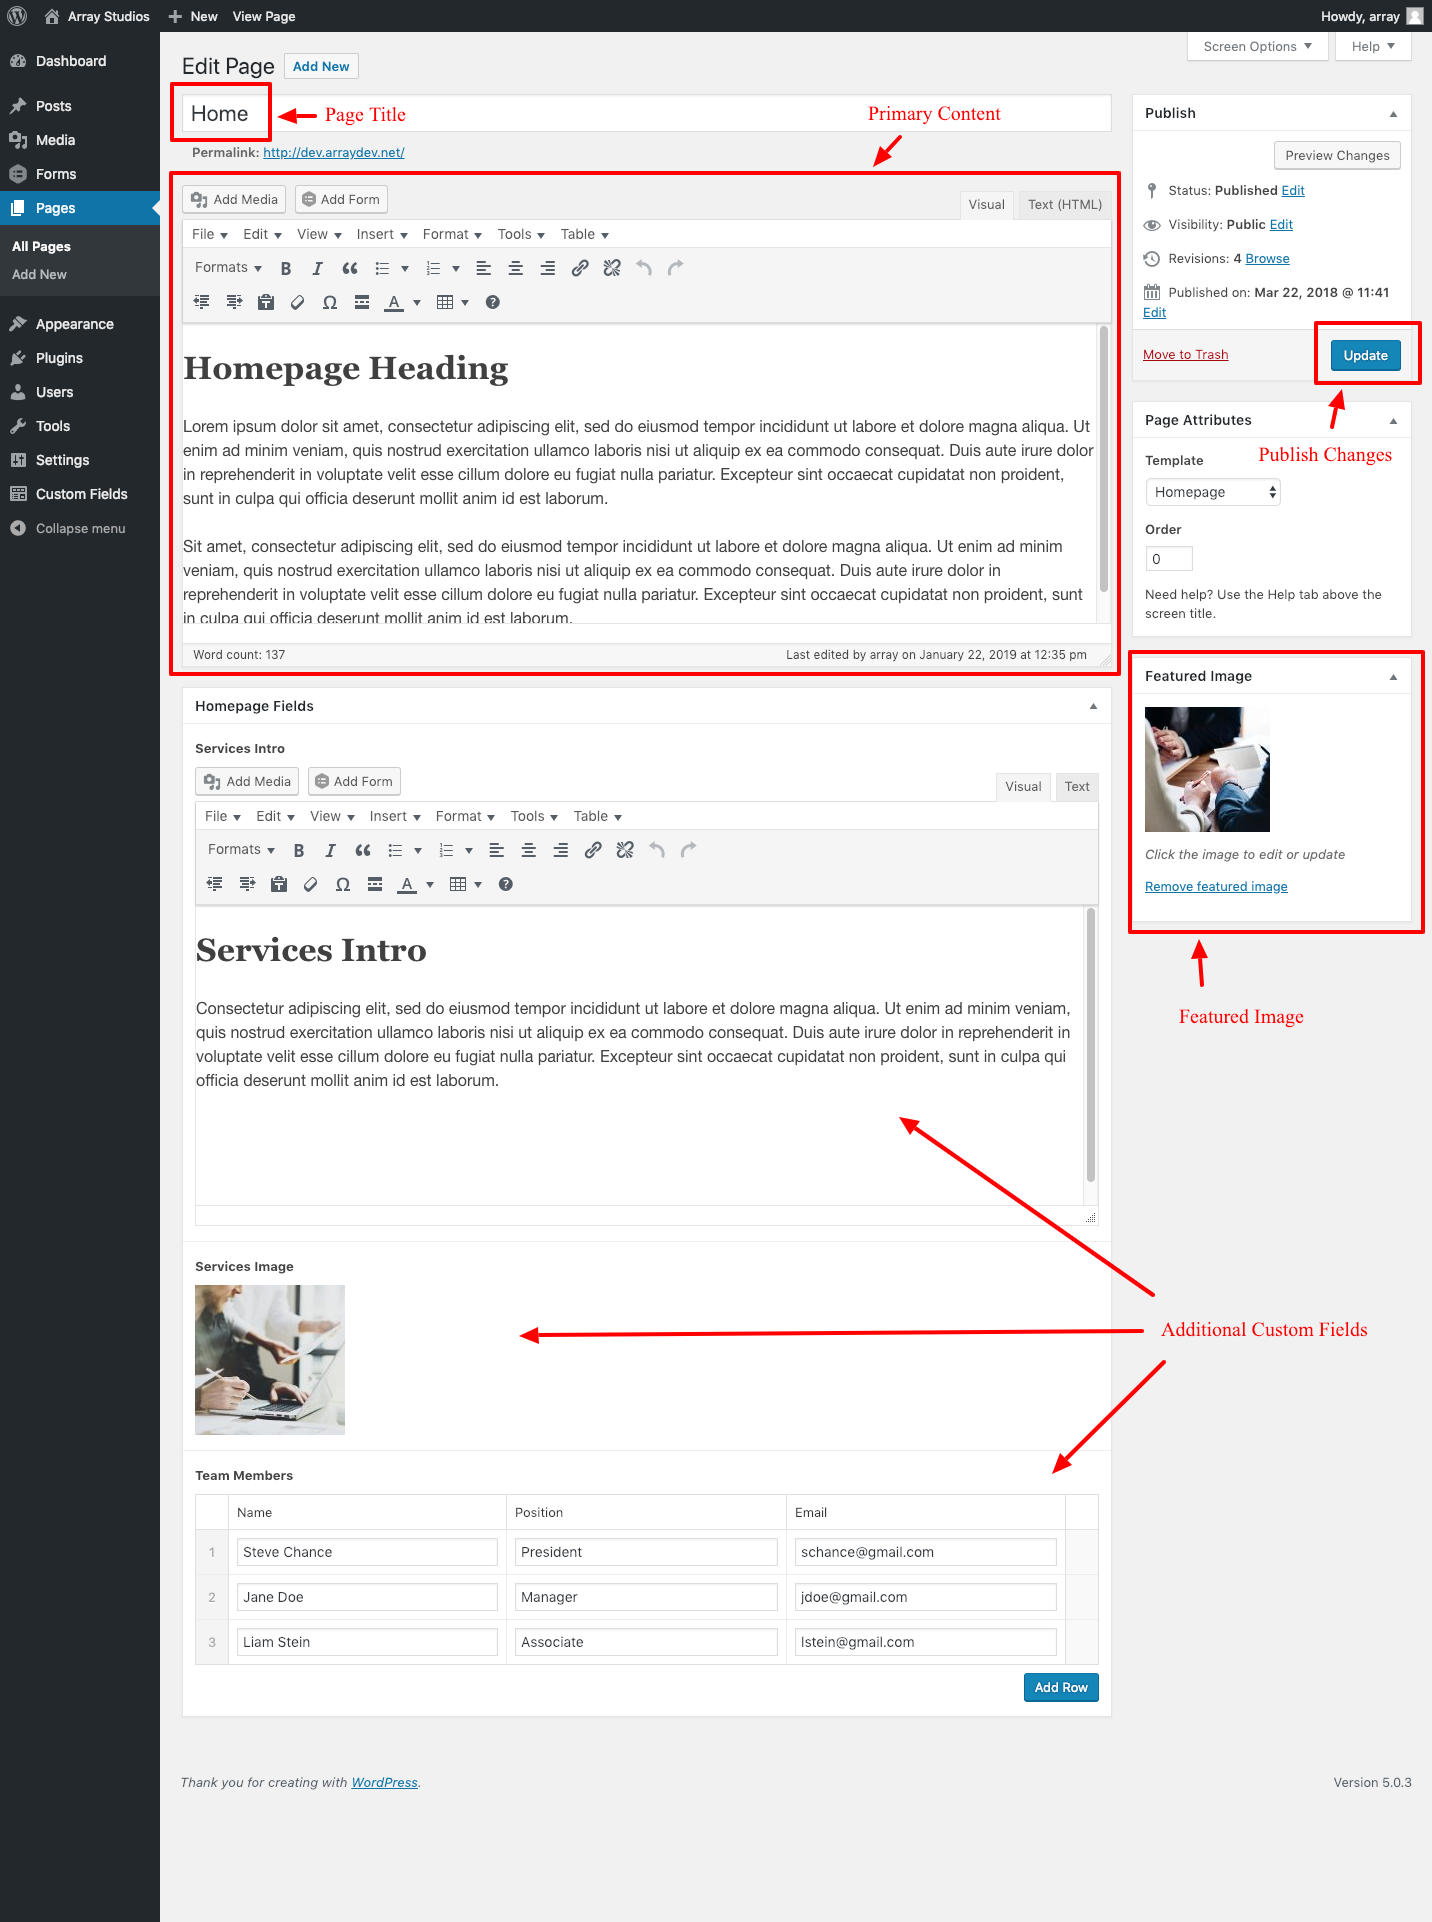
Pages generally contain static content and edit’s to pages happen somewhat less frequently than posts (eg. Homepage, About, or Contact). Because of the static nature of pages they are able to have custom templates which allow for more varied layouts with multiple blocks of content. The content in these additional blocks will be stored in custom fields that you will see as you scroll down the backend of the page. See the screenshot below for an example homepage backend.
Outline of content blocks on a sample homepage backend.
To publish and changes you make to this page in the text editor, field, or image click the blue Update button on the right. If you are unsure of the changes you have completed you can use the Preview Changes button above to see a demo of the page without publishing the changes.
Pages also maintain a revision history. In the event that changes need to be reverted you can jump back to previous edits.
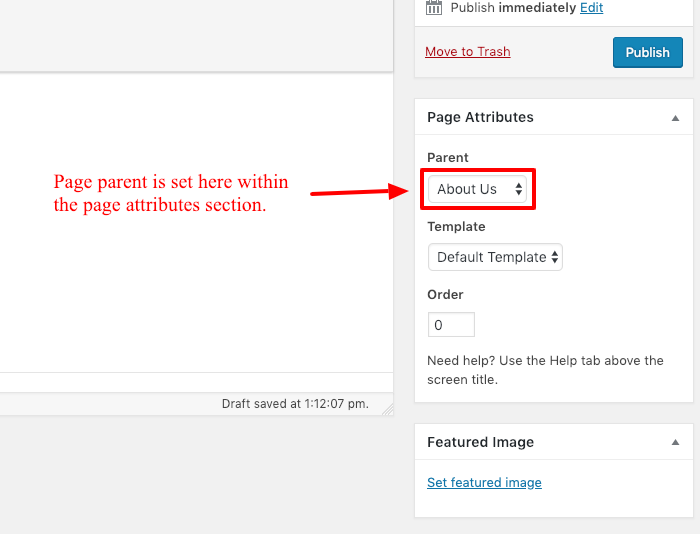
Page Hierarchy
Pages are also hierarchical, meaning they exist in a tree of all other pages. For example you could have an About Us page as a top level parent page with Our Team and Our Mission as child pages. Assigning pages the correct location in the hierarchy will keep your site organized and keep your URLs readable (eg. for the above our team page www.yourdomain.com/about-us/our-team/ ).
Page parent should be set when creating a new page.Example of page hierarchy in the pages list view.
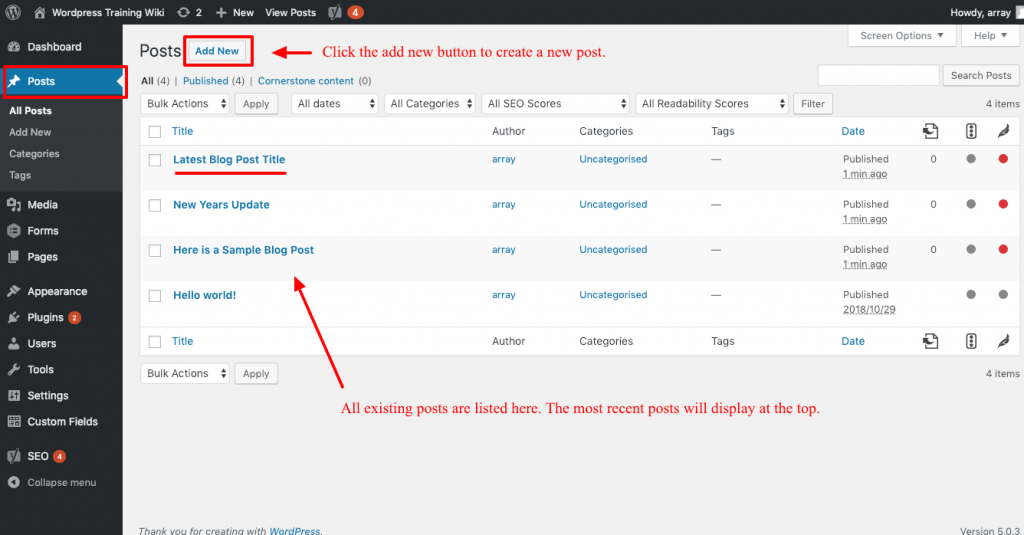
Posts
Not all sites will contain posts, if your site doesn’t have a blog there may not be posts.
Unlike pages posts do not have a hierarchy and instead are organized by date. Posts usually display in reverse chronological order so that the most recently created post will display at the top. The default posts will be connected to the blog or news section of your website.
Post list is displayed in reverse chronological order.
Post Categories
Not all posts will make use of categories
Another special features of posts is the ability to add categories. Adding categories allows for greater organization and is often used to distinguish posts into sub-groupings. A common practice is to have a Featured Post category which often pins the post to the top of the blog feed or allows it to be displayed on other areas of the site such as the homepage.
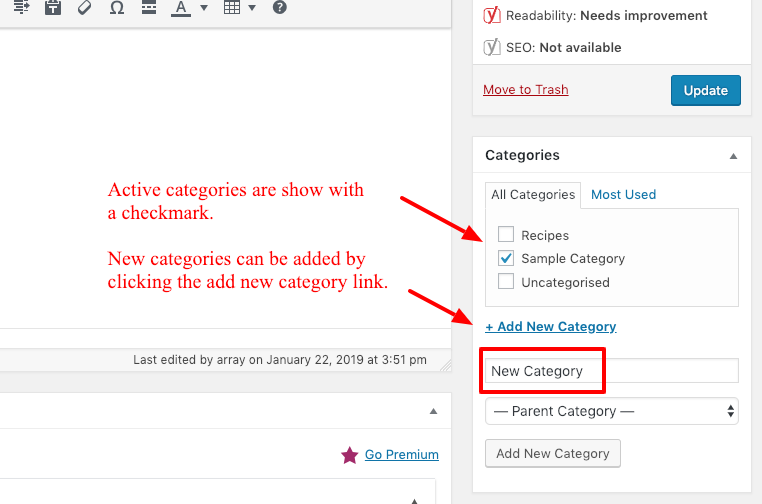
If categories are being used for your posts you can assign them using the categories checkboxes in the right column. New categories can be created using the add new category link below.
Assign and create categories through the categories block.
Custom Post Types
Posts can also be used for other sections of your site that require frequent additions such as a list of team members with bios or a collection of recent projects. These custom post types will in the sidebar navigation within the backend of your site. Once you click into one you will see a list of posts just like the list of posts from your blog. You will be able to create new entries here just like your blog posts but these custom post types will likely have additional fields that will need to be filled in. For team bios you will likely add contact details and for a project multiple images and/or a gallery may be required.
03
Text Editor/How The Editor Works
+
Most of your website edits will take place in the text editor.
The editor functions similarly to an email or Word editor. Type whatever edits you would like make and use the formatting options above to clean up the layout. These controls allow you to do the following:
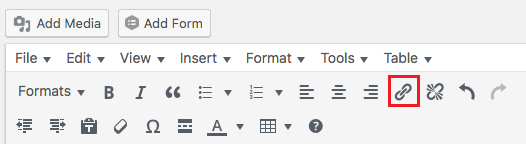
Type your link text first, then highlight it and click the Add Link button.
You can add links to text or images by highlighting the content, then clicking the “add link button”. From here you can type the URL that your visitors will go to. Clicking on an existing link will display a “Link Options” button which will bring up a few additional settings for links.
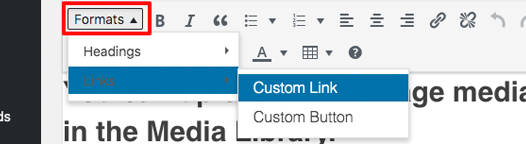
To set a custom link or button style, click on “Formats” and hover over “Links”. This will display all available options.
Based on your website design, you may have custom styled links and buttons available to use. To access these, follow the step above to generate a link, then go to “formats”, and then “links”.
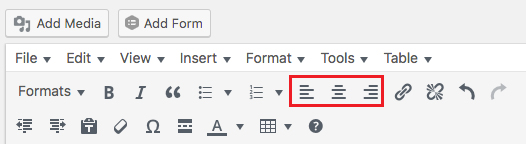
Change Text Alignment
Left, Center, and Right Text Alignment Options
You can align your text content to the left, center, or right of the section. First, highlight your text, then click the alignment button of your choice. This also works for images!
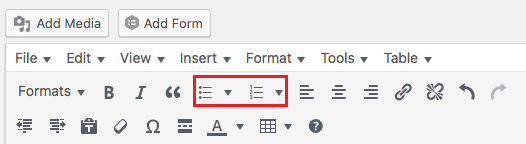
Create Lists
Style Buttons for Bulleted List (Left) & Numbered List (Right).
You have two main list types to choose from; bulleted and numbered (pictured above). Start my clicking a list type, then type in your content. Pressing Enter adds a new list item. The dropdown arrows to the right of the list icon shows additional list options.
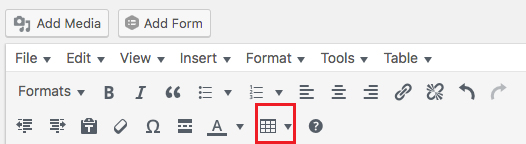
Generate Tables
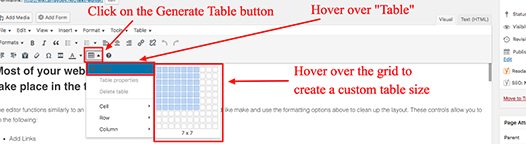
The “Generate Table” button will bring up a simple interface for you to create a custom sized table.
You can hover over the Create Table grid to choose your number of columns and rows
The generate table button allows you to make a customized table to fit your specific needs. Clicking on the button brings up a simple interface where you can select the number of rows and columns that you need. Additionally, you can add to or change these rows & columns by using the dropdown fields listed below the “create table” field.
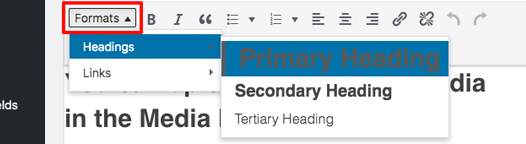
Apply Custom Heading Formats
To see all available custom heading styles, click in “Formats”, then hover over “Headings”.
To change the style of your heading, highlight your text, then click on the “Format” button. This will bring up a list of available heading styles that you can choose from.
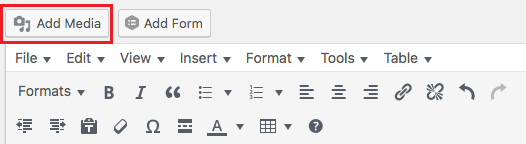
Add Images
The “Add Media” button on the top of your text editor will bring up a Media Library window, where you can select images for your page or post.
You can add images to your page with the “Add Media” button. This will bring up your media library, which shows the existing image content that you have uploaded to the site. To add a new image to your media library, click on the “Upload Media” tab, then choose your desired files.
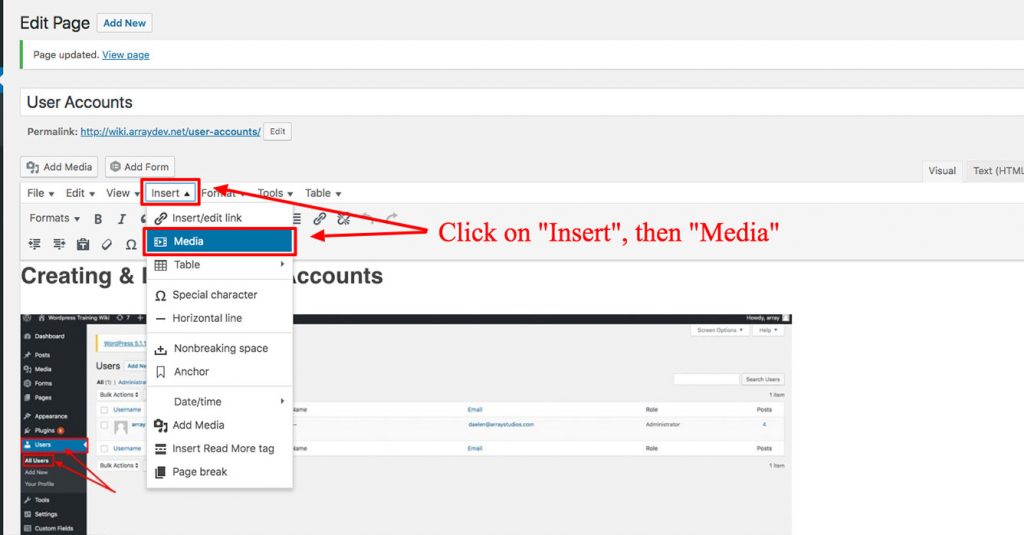
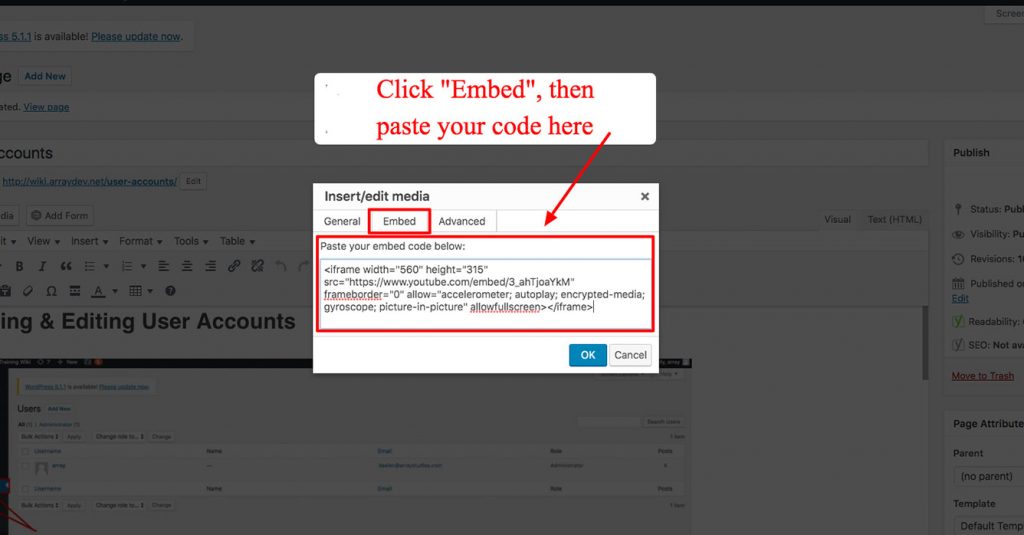
Add A Youtube Video
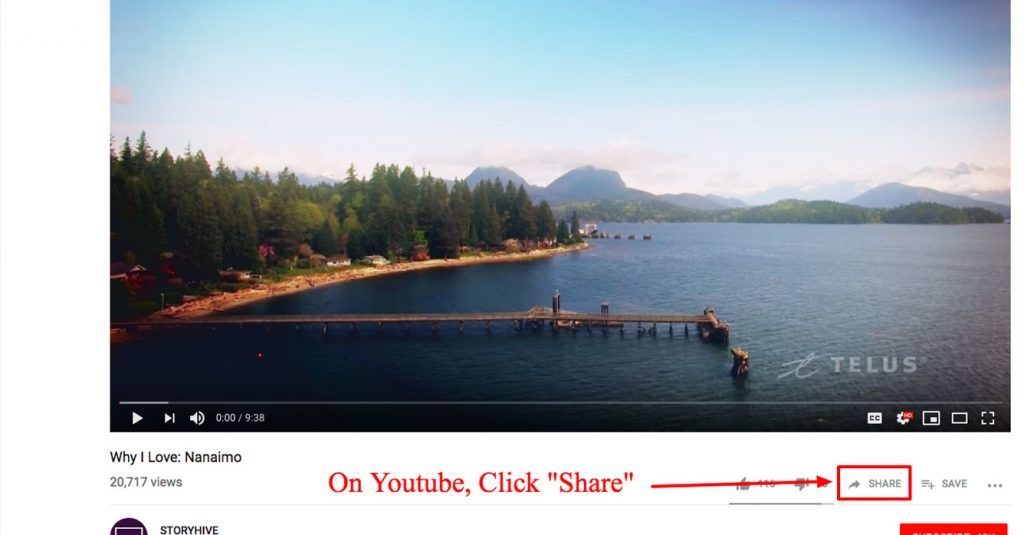
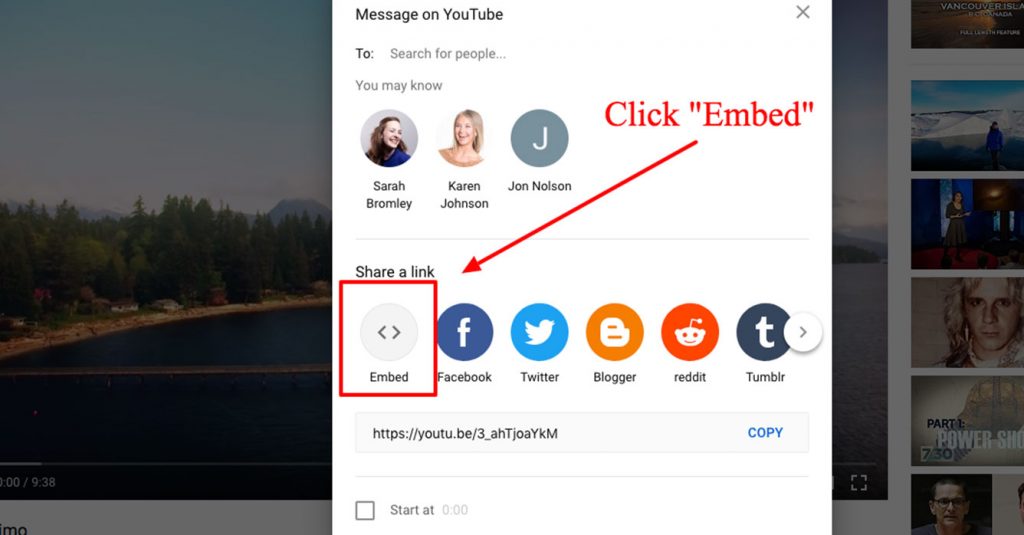
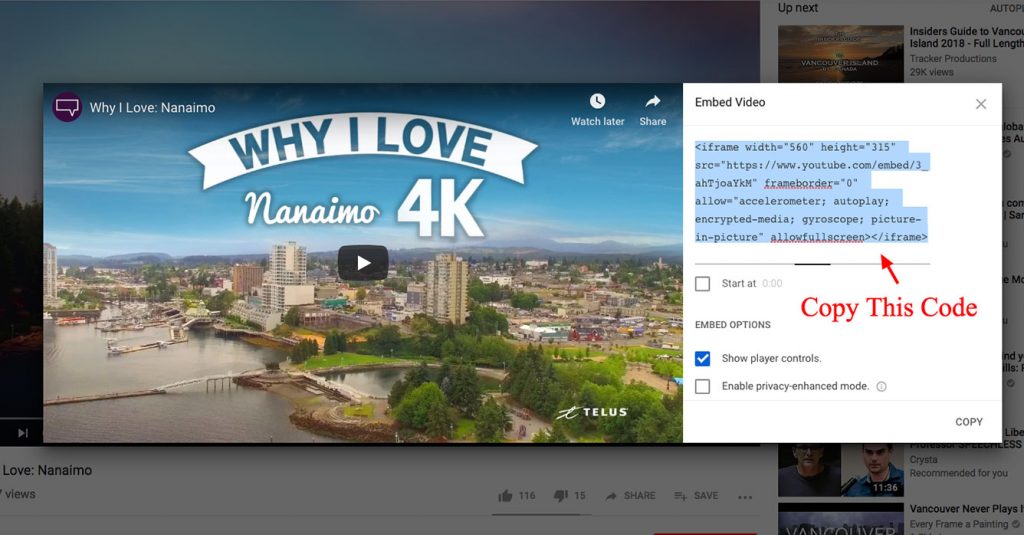
Go to the Youtube video that you’d like to add, then click the “Share” button.This will bring up a pop-up window. Click the “Embed” button.Copy the Embed Code that appears.On your website text editor, click “Insert”, then “Media”.Click on the “Embed” pop-up tab, then paste your code in the provided text area. Click “OK” and you’re done!
Link to .PDF Files
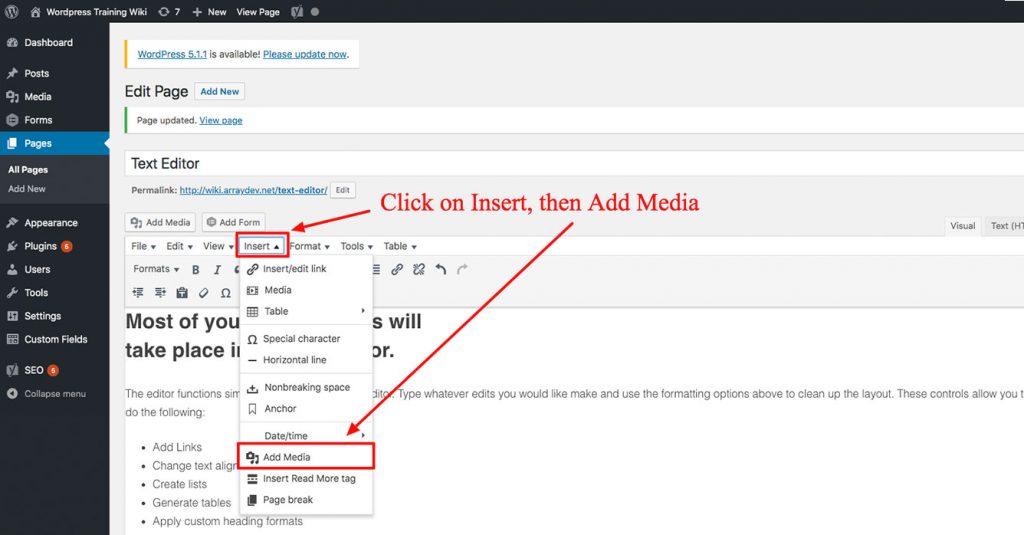
To add a .PDF, click on Insert, then Add Media
To add a .PDF file link into your page or post, click on “Insert” on the top text editor toolbar. Select “Add Media” from the dropdown list, and select or upload your file to the Media Library window that appears.
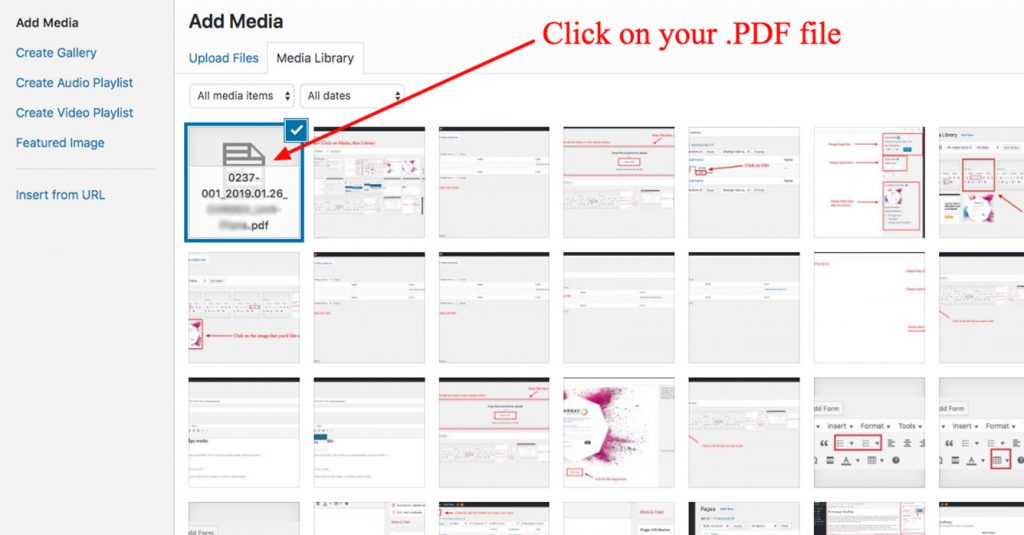
Click on your .PDF file, or upload it by using the “Upload Files” tab (top)
Selecting your .PDF file from the library will insert a link into the page or post. You can click on the generated link and type in a new name if you’d like.
04
Uploading Media
+
You can upload and manage media in the Media Library.
The Media Library is the central hub for all of your site’s visual media. This is where you’ll upload images, make basic edits, and add .PDFs.
Access the Media Library by clicking on “Media” in the side bar, then “Library”
Adding Images / PDFs
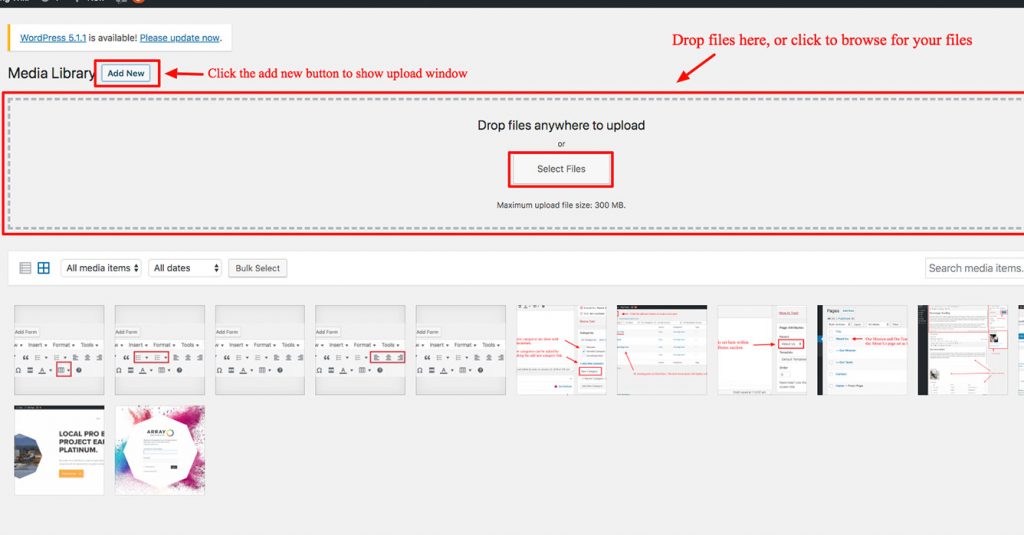
Start by clicking the “Add New” button near the top of your screen. Then you can drag and drop or browse for your files to upload.
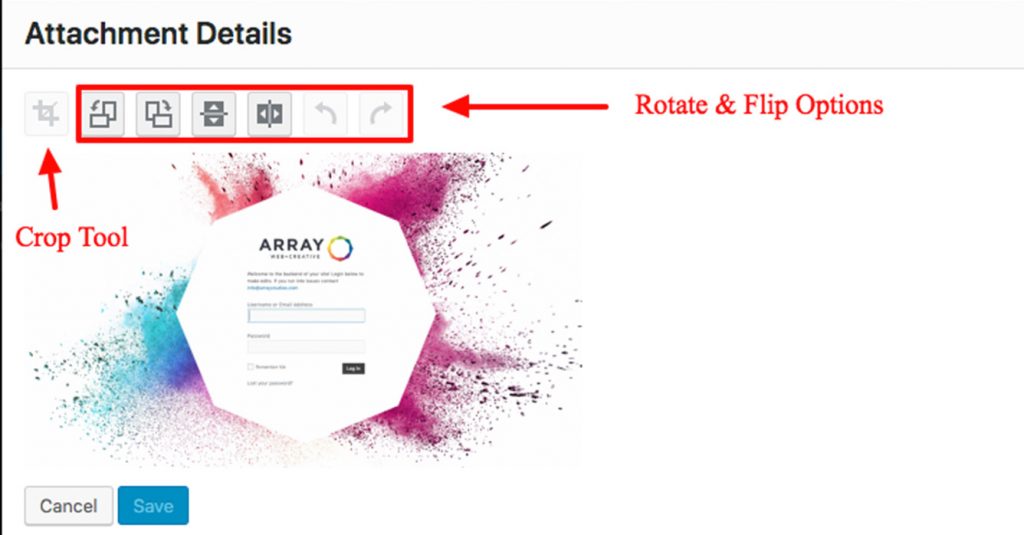
Editing Images
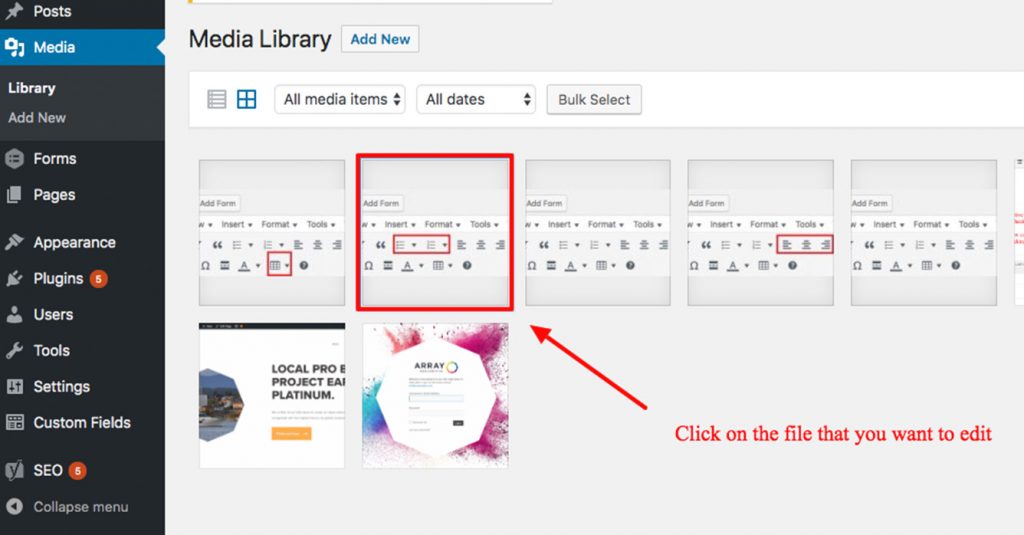
To make image edits, click on the desired image in the Media Library.
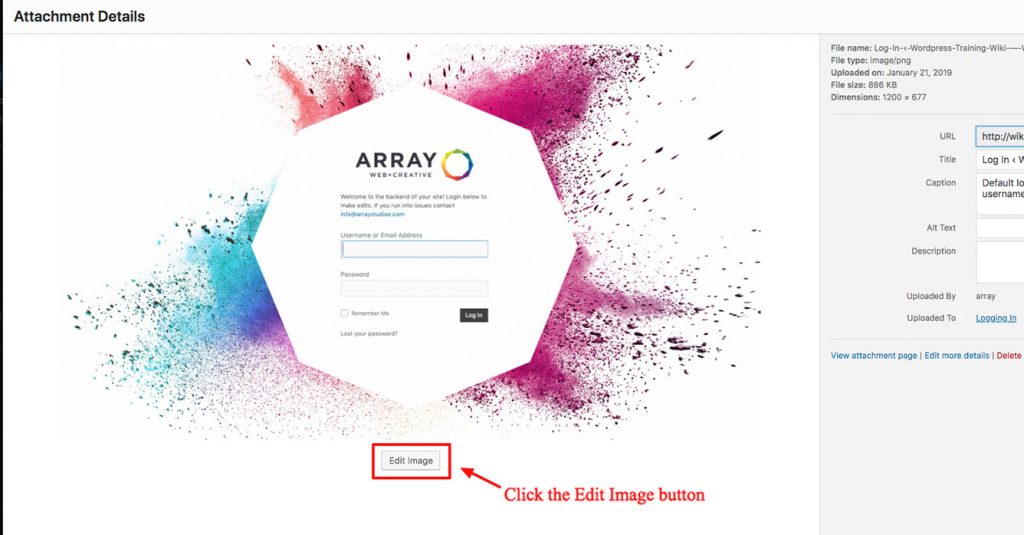
From here, click on the “Edit Image” button that shows below the image preview.
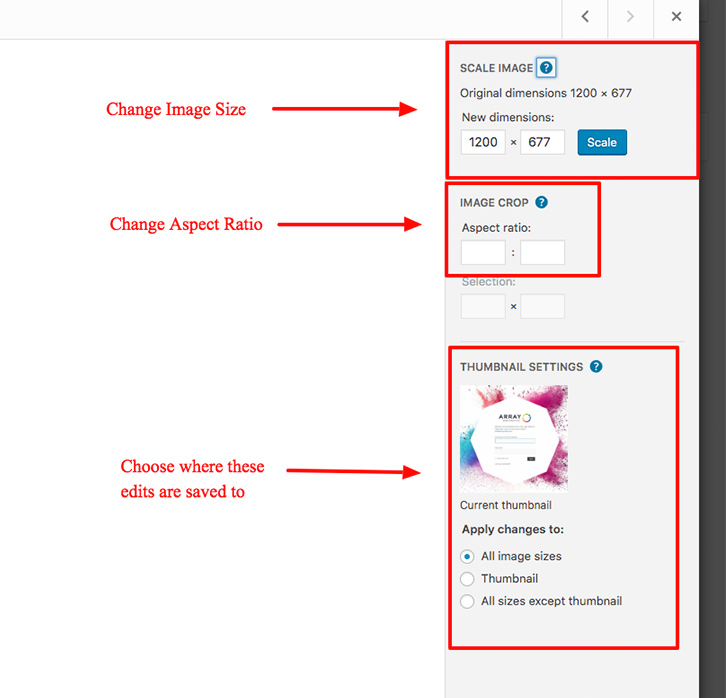
This brings you to the image editing screen where you can rotate / flip your image, change the dimensions and aspect ratio, or change the thumbnail settings.
Click save when you’re done and you’re good to go!
05
Contact Forms
+
Viewing Contact Form Submissions
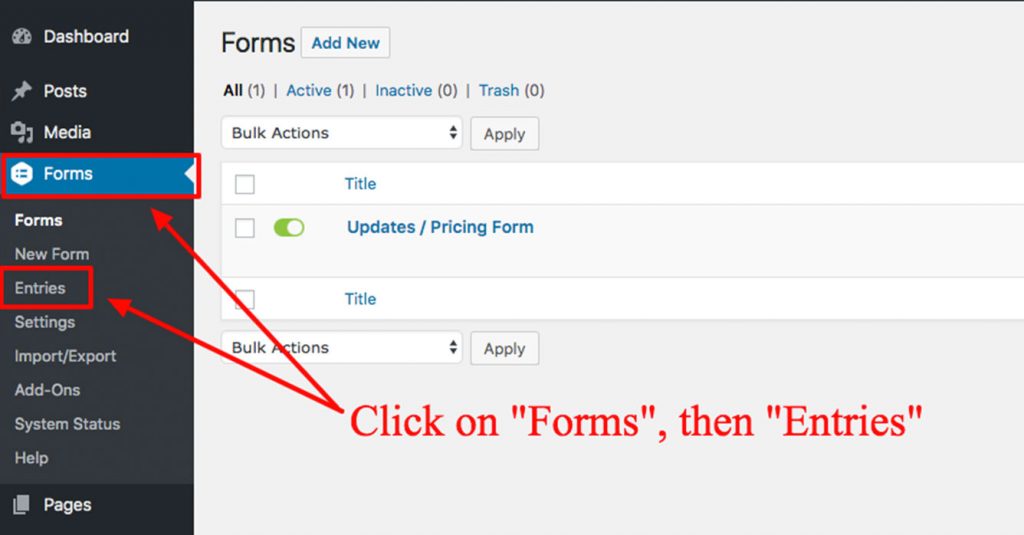
You can see a full list of your contact form submissions by clicking “Forms” in the sidebar, then selecting “Entries”. This will show an organized list of all past form submissions.
06
Creating & Editing User Accounts
+
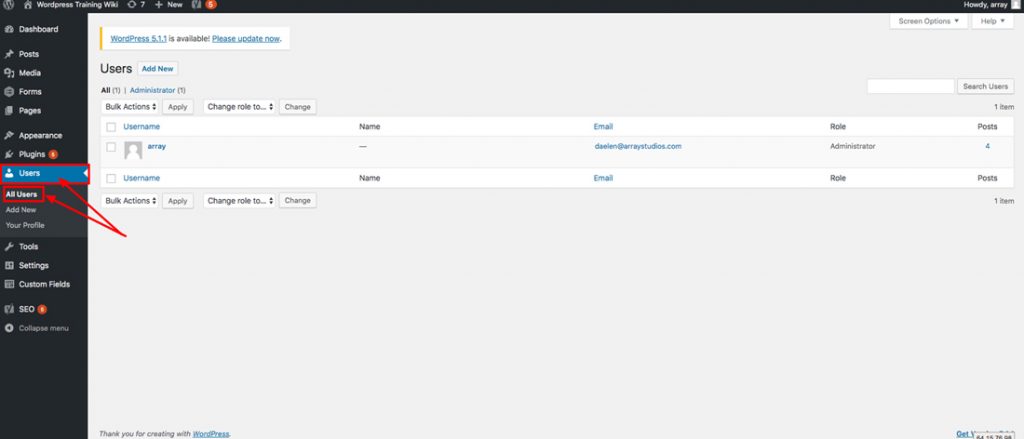
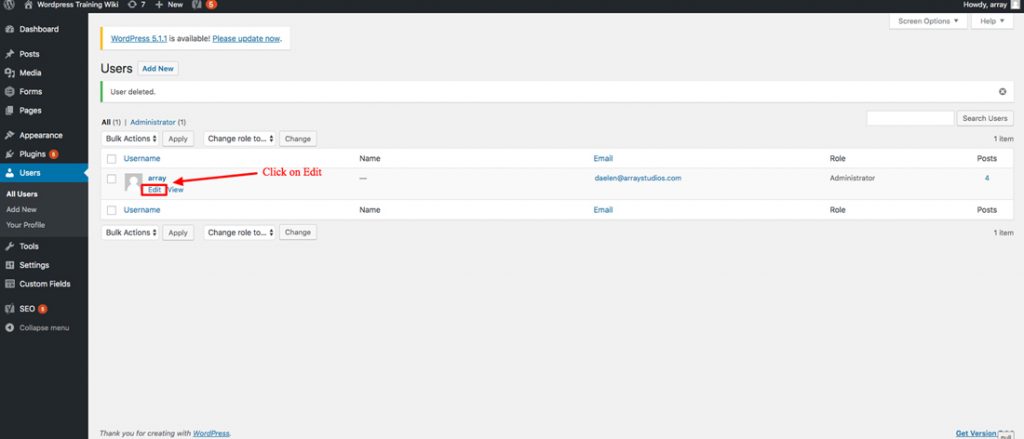
You can access the list of current User Accounts by clicking on “Users” in the Sidebar, then select “All Users”.
Resetting or Changing Your Password
Hovering over your profile name will reveal the edit button.
From the “All Users” page, click on “Edit” under your profile name. This brings you to the “Your Profile” page with your account settings.
The “Generate Password” will make you a random password. You can erase the one created and make your own.
Scroll down to the button labeled “Generate Password”. Here you can either generate a random password, or create your own. If you make your own, be sure that it ranks as “Strong”.
Customizing Your User Account
In the “Your Profile” page you can also add a profile picture, change your nickname (the name other users see you as), and change your name that appears on blog posts.
Adding a User
To add a new user to your website, click on “Users” in the sidebar, then select “Add New”. This will bring you to the next step of entering the new user’s information. The Username and Password entered here will be the details used to login to the website editor from www.website.com/wp-admin.
07
Guttenberg Editor
+
The Gutenberg Editor is a block-based content editor that allows you to build pages by stacking individual content blocks (like text, headings, images, buttons, and more). This editor is ideal for creating more structured layouts and gives you more flexibility over the type of content you’d like to feature for each page. When you open a page that uses Gutenberg, you’ll see a clean white editing area where each piece of content is placed inside its own block.
General Overview
At the top of the page, you’ll notice a text field that says Navigation Page Title. This box is restricted for the page name and NOT the main heading. Below this box, the default block is a Paragraph block (see Page 16). You can click anywhere to start typing, then use the “+” button to open the shortcut to add new blocks.
Top Toolbar & Sidebar
The toolbar at the top of the Gutenberg editor helps you manage blocks and structure your page.
“+” Button (blue, top left): Opens a searchable menu of all available blocks.
Undo/Redo Arrows: Step back or forward through your changes.
List View (three lines icon): Shows a collapsible outline of your content, like a Table of Contents. Use this toolbar to add blocks, navigate your page, and make quick edits with ease.